Conform Pulls in Content Hub allows you to locate, trim, and consolidate your Original Camera Footage for your Picture Finishing Vendor.
Preparing EDL
The Content Hub Conform Pull tool will require an EDL when submitting a pull request. Before exporting your EDL, we recommend that you remove any effects that have been applied in your offline edit and creating a clean 1 track timeline.
AVID:
If you happen to be editing in Avid you can do this simply by right clicking on your sequence in your bin and choosing Decompose. This can create a new sequence with all effects & transitions removed. From there you can export your EDL.
Accepted EDL formats: File 32 or 129 ELDS
(CMX 3600 is NOT accepted)
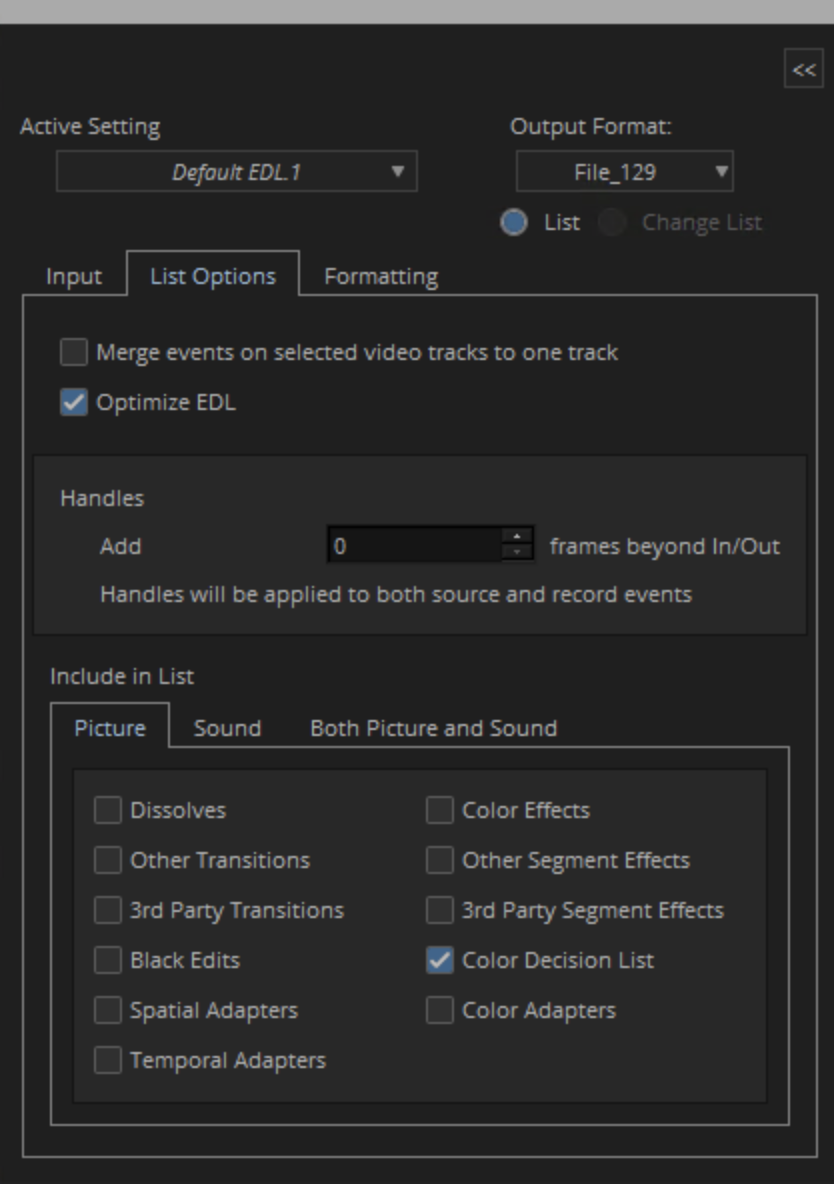
Avid List Tool Settings:
Please only select the following (everything else should be un-checked)
* Color Decision List
* Clip Names
Figure A
Adobe Premier:
EDL Export Settings:
 .
. 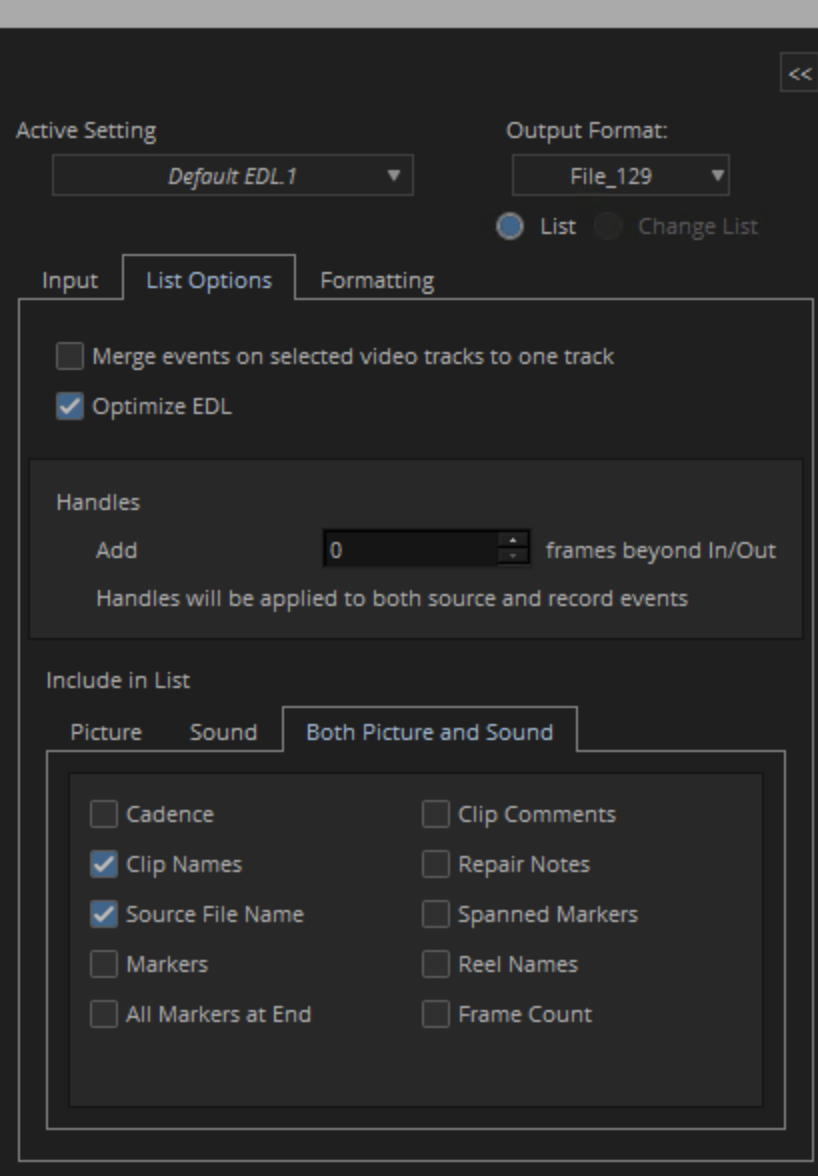
Figure B
Conform Pulls Settings
Before submitting your first conform pull you will need to ensure your project default settings for Conform Pulls are correct. In your Content Hub project, select the Conform Pulls tab and then select Settings.
Figure C
In the menu that is now visible you customize the following fields:
- Format: This will be set to OCF delivery.
- Number of Handles: This will be the number of extra frames added to both the head and tail of each clip pulled.
- Output Naming: The output naming option will determine how the files are named. For a conform pull you will likely want to use Source FileName, which will leave the original source file named on the delivered media.
- Filter Lists File: This option allows you to filter content out of your EDL that you do not want delivered
Figure D
When satisfied with the setting select Update. If you ever want to restore the default settings you can select Rest to Default.
Figure E
Conform Pulls Walkthrough
Log into Content Hub, navigate to your project and select the Conform Pulls tab. Here you can monitor all active conform pulls as well as submitting new conform pulls.
Figure F
Select Create Conform Pull.
Figure G
From the now visible menu select the vendor you would like to send this media to, if you are not seeing the vendor you need to send to please reach out to your Netflix Contact.
Figure H
In the Conform Pull Settings you will see all your project specific default settings applied and if needed you can make any modifications.
Figure I
Next drag and drop your EDL into the list file section. Then select Create.
Figure J
Now the system will run an inspection on your EDL and notify you of any issue and allow you to fix them before you submit the job. Any illegal characters will be removed and many events like slugs or other timeline events that are not video clips may be automatically removed. For help troubleshooting EDL warnings, please click here.
Figure K
To attach any additional files, like a quicktime reference, select the text under the header Attachments. Then select Add Attachments. Attachments cannot exceed 5gb per file.
Figure L
If you wish to remove any events before submitting, select the trashcan icon located in the actions column for that event.
Figure M
If you wish to save an event for later, select the watch icon located in the action column for that event. This will create a new submission in draft that you can deal with later.
Figure N
Once you are satisfied with your submission, select the Submit button.
Figure O
You can add a note with any additional information you might want to include about your conform pull, this note will be included in the email confirmation. Then select Confirm.
Figure P
Your pull has now officially been submitted and the statues will now show as Queued.
Figure Q
Both you and the recipient will receive an email confirmation stating the pull has been submitted. The email will show the submission name, number of events, when it was submitted, who submitted the pull, any notes left, and a breakdown of the shots included in the submission.
Figure R
Monitoring Your Submissions
If you would like to monitor the submission. From the email select View Details in Content Hub and you will be taken to the submission details page or from the Conform Pulls tab select your submission.
Figure S
You will see an overall status for the pull above your events, and then a status for each event in the status column of the table.
Figure T
On the Conform Pulls tab you will also see that your submission is in progress.
Figure U
When your pull is completed on the Conform Pulls tab you will see a status of Completed as well as on the submission page, Render Status will be 100%, and each event will say Completed.
Figure V
You and the recipient will also receive an additional email letting you know that your submission is Completed.
Figure W
Downloading Your Submission
Once your submission is completed you can download the complete package of all events on the Conform Pulls tab by selecting the download icon from the actions column.
Figure X
On the Submission Details Page you can download each individual event by selecting the Download Icon from the actions column.
Figure Y
When downloaded you will see a directory named after the EDL. A subfolder named Attached_Files which contains the original EDL as well as a CSV breaking down each event in the pull. Then each camera format will have its own directory. The camera directory will have a subfolder for each resolution, followed by a folder for each event in the EDL. These folders will be named after the original file name appended with the start frame and end frame contained in the pull.
Figure Z
EDL Warnings
Previously Delivered Events
For any events that have previously been delivered you will have the option to remove them from the current pull by selecting Remove Previously Delivery Events in the header.
Figure AA
To dismiss the warning and have the events delivered again select Dismiss.
Figure BB
Finding Events with Errors
For any events that have errors you can resolve them by selecting the 1st event with errors text from the red banner at the top of the screen.
Figure CC
You will now see that the event with an issue is highlighted in the table and in the right hand panel you will see the details of the clip including why the error occurred.
Figure DD
You can also find the next event with errors by selecting Next event with errors from in the bottom of the right hand panel.
Figure EE
Source Clip Name Mismatch
If the error on your EDL is due to a source clip name not matching any record in Content Hub, you can choose to edit the Source Clip name in the right handle panel.
Figure FF
Once you have made the necessary corrections select Update. This will re-run the conform on that particular event.
Figure GG
You will see Ready to Submit in the table if the re-conform was successful.
Figure HH
Multi Source Clip Match
If the source clip in your EDL has matched with more than one source clip in the database you will see the possible options in the right-hand side panel.
Figure II
You will need to select the proper source clip, if you do nothing Content Hub will conform to the first matching clip by default. By hovering over each possible source clip you will see metadata about each clip to help you make your decision.
Figure JJ
Once you select the correct clip, select Update and this will re-run the conform on that particular event.
Figure KK
You will see Ready to Submit in the table if the re-run was successful.
Figure LL
Timecode Errors
If your source clip has any timecode errors they will be highlighted in red. You will have the option to either fix the timecode errors or pull the entire available clip.
Figure MM
To pull the entire available clip, select the Pull entire available clip button located in the right hand side panel. The timecode will then automatically update.
Figure NN
To fix the timecode errors manually type in the desired start and end timecode for your clip. You will see the available start and end frame below.
Figure OO
Select Update and this will re-run the conform on that particular event.
Figure PP
You will see Ready to Submit in the table if the re-run was successful.
Figure QQ